Tekstit

Näytetään blogitekstit, joiden ajankohta on huhtikuu, 2018.

Ubiquity Robotics ROS image

Kuva
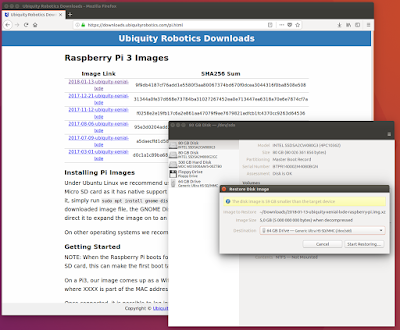
Raspberry PI 3  image with ROS installed (but with a catch). https://downloads.ubiquityrobotics.com/ Image is very easy to flash. apt-get install gnome-disk-utility This is precustomized for Ubiquity Robotics Magni robot. https://ubiquityrobotics.com/magni.html Github related: https://github.com/UbiquityRobotics/ubiquity_main How to disable the default magni default ROS setup starting: https://askubuntu.com/questions/19320/how-to-enable-or-disable-services Type: systemctl disable magni-base Not fully stable due to memory issues? https://answers.ros.org/question/249515/raspberry-pi-crashes-when-i-try-to-build-the-catkin-workspace/ Workaround .. no parallel compiling catkin_make -j 1 How to disable user interface and enable ssh (if not needed, GUI takes quite much memory): http://ask.xmodulo.com/disable-desktop-gui-raspberry-pi.html raspi-config Bluetooth had issues on this setup. Raspbian worked, used similar settings and got BT working. Commented follo

Matrox G200eW 1920x1200 resolution on Ubuntu 16.04

Recipe for Matrox G200eW 1920x1200 resolution on Ubuntu 16.04. (Note: Needs patch for Xorg, not easy for beginners) I am using X9SCM-F with built-in VGA controller and IPMI. Only x8 PCIe slots on this motherboard. My path is laid out below, I did not retry all of this once got it working. The resolution is most likely restricted for KVM to work. I am not interested on monitor redirection on this system, I use this system as workstation. I use 16bpp bit depth on Xserver and seems to work. The patch workings are courtesy of Samir Ibradzic. Credits to other authors whose writings helped me figure this out. https://lists.x.org/archives/xorg-devel/2012-January/028523.html The patch is for this specific PCI identifier controller in driver source, pMga->is_G200WB = (pMga->Chipset == PCI_CHIP_MGAG200_WINBOND_PCI);{ PCI_CHIP_MGAG200_WINBOND_PCI,     "mgag200 eW Nuvoton" },  $ lspci -s 03:03.0 03:03.0 VGA compatible controller: Matrox Electronics Systems Ltd. MGA G2

ROS with VESC motor controller

ROS Kinetic and VESC, a simple recipe on Ubuntu 16.04 - Install ROS kinetic full desktop http://wiki.ros.org/kinetic/Installation/Ubuntu - Install ROS serial apt-get install ros-kinetic-serial - Create catkin_ws mkdir catkin_ws cd catkin_ws mkdir src cd src catkin_init_workspace - Install VESC driver packages git clone from: https://github.com/mrsd16teamd/loco_car To compile, need loco_car/utilities/ackermann_msgs loco_car/utilities/vesc Compile  . /opt/ros/kinetic/setup.sh cd ~/catkin_ws catkin_make  Each terminal needs setup, unless append to .bashrc . /opt/ros/kinetic/setup.sh . ~/catkin_ws/devel/setup.sh Terminal 1. Run roscore roscore Using VESC STM32F407 as serial port, mapped as /dev/ttyACM0 $ lsusb .. Bus 001 Device 010: ID 0483:5740 STMicroelectronics STM32F407 $ cat /sys/class/tty/ttyACM0/device/uevent DEVTYPE=usb_interface DRIVER=cdc_acm PRODUCT=483/5740/200 TYPE=2/0/0 INTERFACE=2/2/1 MODALIAS=usb:v0483p5740d0200dc02dsc00dp00ic0

VESC open source motor controller

I use VESC for controlling brushless motor. Control target is closed loop control with feedback sensing on electrical robot locomotion. Purpose of this blog entry is to keep record atleast for myself. VESC is developed by Benjamin Vedder. The design is open source and comes in different version on hardware and software. VESC supports various operation modes with feedback by back EMF, hall sensors and encoders. Documentation for modes could be improved. Per code review the hall sensor cannot be not used as primary feedback method, rather the code relies on back EMF. Due to this, the calibration of feedback is necessary to get the motor working properly. With bad calibration, the back EMF feedback is not stable. Unstable operations can be seen as oscillating control signal, which can also result power rails to become unstable due to power surging to motor. STM32F4 supports quadrature encoder A/B signals by hardware and VESC uses this functionality also. I have not tested quadrat

Using Playstation 4 Dualshock on Raspberry PI 3

Short recipe for using ds4drv on Raspberry PI 3 (tested on raspian jessie). See links below for details. Install Python pip and joystick packages, apt-get install joystick apt-get install python3-pip python-pip pip install ds4drv Bluetooth -> Add Device  DS4: Share + Playstation button (see howtogeek for image) To use the trackpad as mouse: sudo ds4drv --hidraw --trackpad-mouse Output: root@raspberrypi:/home/pi# ds4drv --hidraw --trackpad-mouse [info][controller 1] Created devices /dev/input/js1 (joystick) /dev/input/event5 (evdev) [info][controller 1] Connected to Bluetooth Controller (70:20:84:9A:B5:AF hidraw3) [info][hidraw] Scanning for devices [info][controller 1] Battery: 45% Ds4drv usage: usage: ds4drv [-h] [--version] [--config filename] [--hidraw] [--daemon]               [--daemon-log file] [--daemon-pid file] [--next-controller]               [--profiles profiles] [--battery-flash] [--bindings bindings]               [--profile-toggle butt

test entry

Lorem ipsum